(準備)
先生を呼ぼう。「mmmm」を設定。
1)キャラクターの設定変更
・名前は好きなように変更
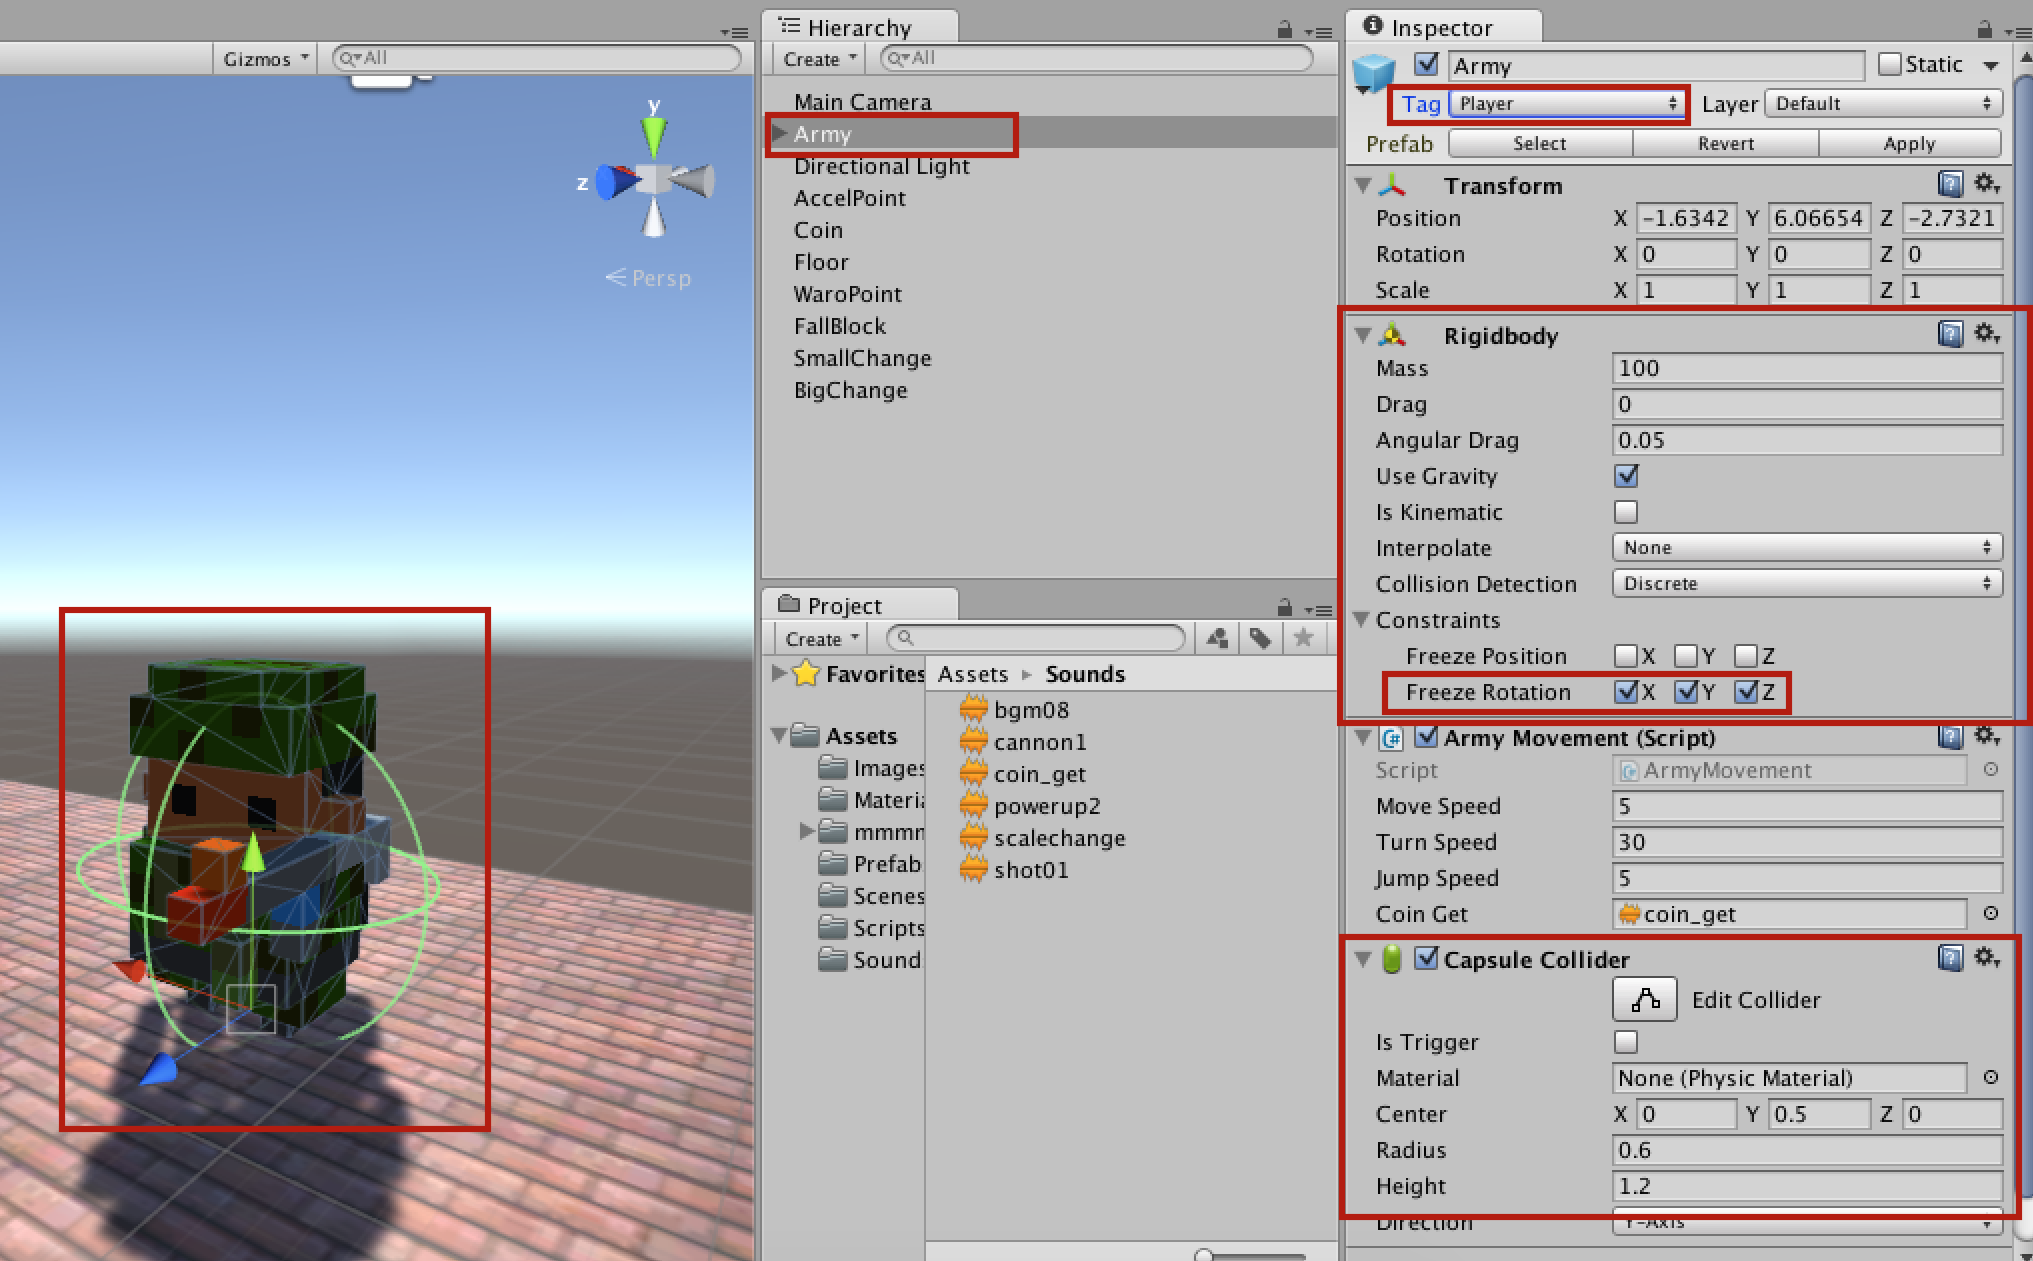
・「Tag」を「Player」に変更
・「Rigidbody」の「Mass」(質量)を「100」にする。(質量を大きくして重たくすると、キャラクターの安定感が増します。)
・「Rigidbody」の「Is Kinematicのチェックを外す」。
・「Rigidbody」の中の「Freeze Rotation」にチェックを入れる(x,y,z全てに)
・あたり判定をとるための「カプセル・コライダー」付ける。キャラクターをすっぽり囲むように大きさを調整する。
*最初から付いている「Collider」オブジェクトは削除する。(子供として「Collider」という名前のオブジェクトが付いています。)
2)キャラクターを動かす
まずは試しに「Ball」スクリプトをつけてみよう。再生ボタンを押して動きを確認。
(ポイント)このBallスクリプトで動かす時だけは、「Rigidbody」の「Freeze Rotation」にチェックを外すこと(x,y,z全て)。「Mass」も「1」にしてみる。
*新しくスクリプトを作成する。
・C#スクリプトを1つ作成して名前を「ArmyMovement」に変更。
・「(5)戦車を動かす」を参考にコードを記載する。
・コードができたらチェック。
・「Ball」スクリプトを外して、「ArmyMovement」スクリプトをドラッグ&ドロップ。
・「Move Speed」は「Playerの移動速度」、「Turn Speed」は「Playerの旋回速度」です。
・ここには全体のバランスを考えながら好きな数字を入れてみましょう。
3)キャラクターをジャンプさせる
・「ArmyMovement」スクリプトにコードを追加していきます。
・追加するコードはBallGameのテキスト「[14]ジャンプできるようにしよう」を参考にして書いてみましょう。
・コードが書けたらチェック。
・「Jump Speed」は自由に設定してみましょう。
4)コインをゲットする
・これも「ArmyMovement」スクリプトにコードを追加していきます。
・追加するコードはBallGameのテキスト「[7]コインをゲットしよう」を参考にして書いてみましょう。
・コードが書けたらチェック。
5)コインの残り枚数を表示する。
・これも「ArmyMovement」スクリプトにコードを追加していきます。
下記のコードを追加しましょう。(★★★の部分)
using UnityEngine;
using System.Collections;
// ★★★
using UnityEngine.SceneManagement;

public class ArmyMovement : MonoBehaviour {

	public float moveSpeed;
	public float turnSpeed;
	public float jumpSpeed;
	public AudioClip coinGet;

	private bool isJumping = false;
	private Rigidbody rb;
	private float movementInputValue;
	private float turnInputValue;

	// ★★★
	private int count;

	void Awake(){
		rb = GetComponent<Rigidbody>();

		// ★★★
		count = 0;
	}

	// ★★★
	public int Coin(){
		return count;
	}

	void Update(){
		movementInputValue = Input.GetAxis("Vertical");
		turnInputValue = Input.GetAxis("Horizontal");

		if(Input.GetButtonDown("Jump") && isJumping == false){
			rb.velocity = Vector3.up * jumpSpeed;
			isJumping = true;
		}
	}

	void FixedUpdate(){
		Move();
		Turn();
	}

	void Move(){
		Vector3 movement = transform.forward * movementInputValue * moveSpeed * Time.deltaTime;
		rb.MovePosition(rb.position + movement);
	}

	void Turn(){
		float turn = turnInputValue * turnSpeed * Time.deltaTime;

		Quaternion turnRotation = Quaternion.Euler(0, turn, 0);

		rb.MoveRotation(rb.rotation * turnRotation);
	}

	void OnCollisionEnter(Collision col){
		if(col.gameObject.CompareTag("Floor")){
			isJumping = false;
		}
	}

	void OnTriggerEnter(Collider other){
		if(other.CompareTag("Coin")){
			Destroy(other.gameObject);
			AudioSource.PlayClipAtPoint(coinGet, transform.position);

			// ★★★
			count += 1;
			if(count == 3){
				Invoke("ReturnToFile", 0.5f);
			}
		}
	}

	void ReturnToFile(){
		SceneManager.LoadScene("GameClear");
	}
}
*もう1つ「GameController」スクリプトを下記のように修正しましょう。(★★★の部分)
using UnityEngine;
using System.Collections;

using UnityEngine.UI;
using UnityEngine.SceneManagement;

public class GameController : MonoBehaviour {

	// ★★★ 「Ball」を「ArmyMovement」に変更する。
	public ArmyMovement coinCount;


	public CoinPanel CoinPanel;
	public float timeCount;
	public Text timeLabel;


	// Update is called once per frame
	void Update () {
		CoinPanel.UpdateCoin (coinCount.Coin ());

		timeCount -= Time.deltaTime;
		timeLabel.text = "Time:" + timeCount.ToString ("0");

		if (timeCount < 0.0f) {
			SceneManager.LoadScene ("GameOver");
		}
	}
}
6)砲弾を発射する
・これはBallにつけていた「ShotShell」スクリプトをそのまま活用しましょう。
・「Hierarchy」→「Create」→「 Create Empty」で「空のオブジェクト」を作成。
・名前を「ShotShell」に変更して、これに「ShotShell」スクリプトをドラッグ&ドロップしましょう。

・「Shell Prefab」「Shot Sound」「Shot Speed」も忘れずに設定。
・ここまでできたら再生ボタンを押して、全ての動きを確認してみましょう。